Follow us on Twitter

Follow Homestead SEO Pro on Twitter

We are pleased to announce that we have recently established a Twitter account for Homestead SEO Pro. If you have a twitter account and find our posts to be helpful, we would love to connect with you! Please feel free to visit our Twitter Page at http://www.twitter.com.homesteadseopro

WHAT YOU WILL FIND ON OUR TWITTER PAGE:

By following our twitter page, you will receive the following updates:

  • Instant notification of recent blog posts
  • Special offers -specifically for our Twitter followers- on upcoming products (ebooks, video tutorials, Advanced SEO efforts, etc)
  • Re-tweets and shares of important Intuit/Homestead related material
  • Helpful images and videos
  • and more…

We look forward to connecting with you and as usual; making your life as an Intuit/Homestead user much easier by providing quality design, and seo tips for Homestead SiteBuilder.

How to get FREE backlinks to your website using Manta.com

Web Design and Internet marketing experts ‘Devline Intermedia’ have recently shared an SEO secret that we believe all homestead users should know for optimizing their homestead websites. Please see the small excerpt below or click the link below to read the entire article.

Today I would like to share an opportunity with you that will allow you to obtain trusted, quality backlink(s) for your website by using Manta.com.

The process is rather simple and not only provides you with additional backlinks to your company website but also creates a venue for your company to be found by new customers who research using the ‘Manta website’.

READ THE FULL ARTICLE HERE:How to get free backlinks using manta.com

How to use Microsoft Outlook with your Homestead email account

My most recent encounter with Homestead support was regarding “setting up my homestead email with Microsoft Outlook” and I am sure you can figure out that they didn’t really have the answers.

I found the “help article” on the homestead website that explains how to set up Outlook to receive my homestead emails but wouldn’t you know THE INFO WAS INCORRECT! I proceeded to set up my outlook account EXACTLY how the help topic explained however, when I would run the test it would say there was a error connecting to the outgoing server (ie: Homestead mail server).

I then contacted a support agent and he said “you should contact your ISP (internet service provider) and ask them how to set up their server for outlook. I mentioned that it was an OUTGOING SERVER ISSUE (meaning it was an issue with homestead servers and not my incoming server (dont worry about the technical stuff, its not important). To make a long story short,… he was NO HELP AT ALL and I was off to figuring this out on my own… This seems to be the story of my life with Homestead.

Lucky for you, I have dedicated my time and efforts to make sure you do not have to experience these kinds of frustration and lack of “knowledgable customer service”! I will now explain to you how to set up your homestead email account with Microsoft Outlook.

(NOTE: This tutorial is designed for Microsoft Outlook 2007, I am told from viewers that the steps provided in this post have worked with Outlook 2010 but have not received any feedback regarding previous versions of Outlook. Your feed back would be helpful if you are running an earlier version of Microsoft Outlook.)

HOW TO SET UP YOUR HOMESTEAD EMAIL WITH MICROSOFT OUTLOOK 2007:

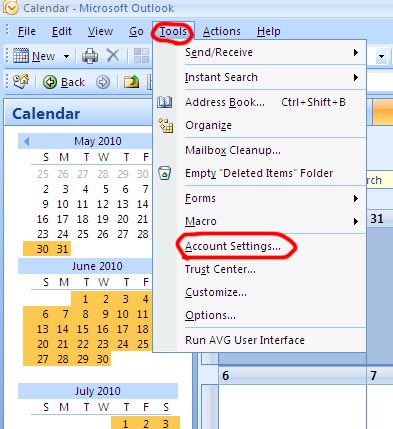
STEP 1: With Outlook open, select the “Tools” tab at the top and scroll down/Click on “Account Settings” (see image below)

step 1 for setting up homestead email with microsoft outlook 2007

STEP 1: Tools > Account Settings


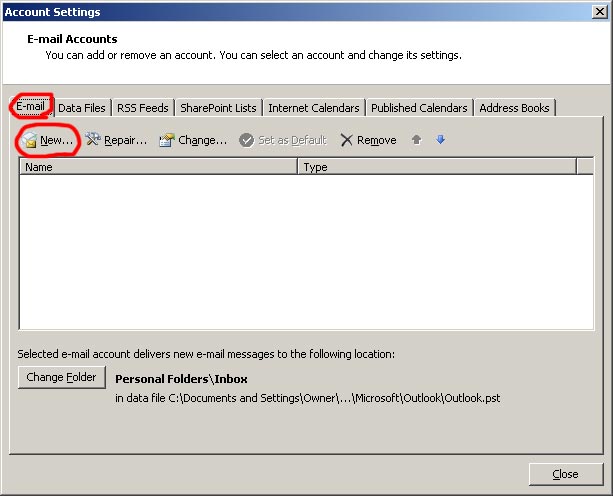
STEP 2: In the “Account Settings” screen, make sure the “Email” tab is selected and then click on “NEW”. (see image below)

step 2 for setting up homestead email with microsoft outlook 2007

STEP 2: Start New Account


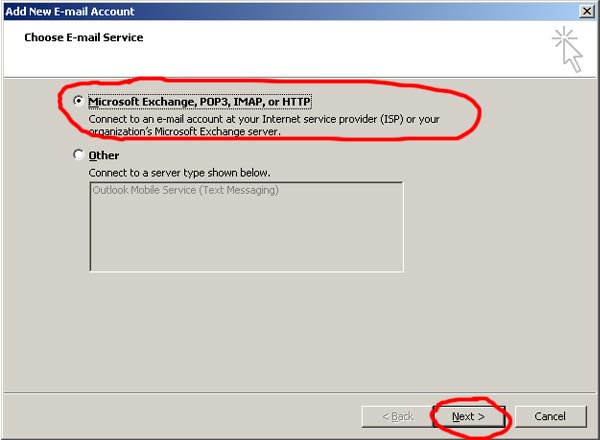
STEP 3 (Choose Email Service Screen): You have two(2) options here, the first is “Microsoft Exchange, POP3, IMAP and HTTP” and the second is “Other“. Homestead email is going to be set up as a POP 3 email account in outlook so you will want to select the first option and then hit next. (see image below)

step 3 for setting up homestead email with microsoft outlook 2007

STEP 3: Select POP 3 option


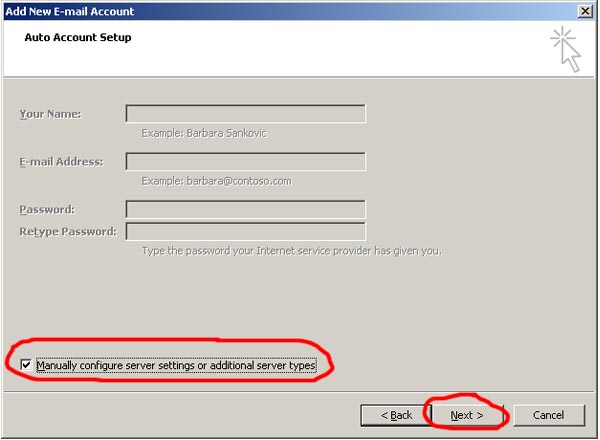
STEP 4: (Auto Account Setup is a NO NO!): You should now be on the “Auto Account Setup” screen. On this screen, you do not want to fill in any of the text fields, You need to click on the select the option at the bottom that says “Manually configure server settings or additional server types” and then click next. (see image below)

step 4 for setting up homestead email with microsoft outlook 2007

STEP 4: Select Manually Configure


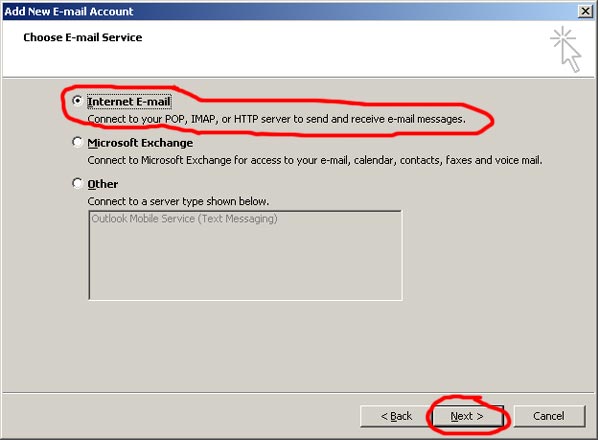
STEP 5 (Choose Email Service): On this screen you will have three (3) options available which are: Internet Email, Microsoft Exchange and Other. You will want to select the “Internet Email” option and the click next. (see image below)

step 5 for setting up homestead email with microsoft outlook 2007

STEP 5: Choose Email service


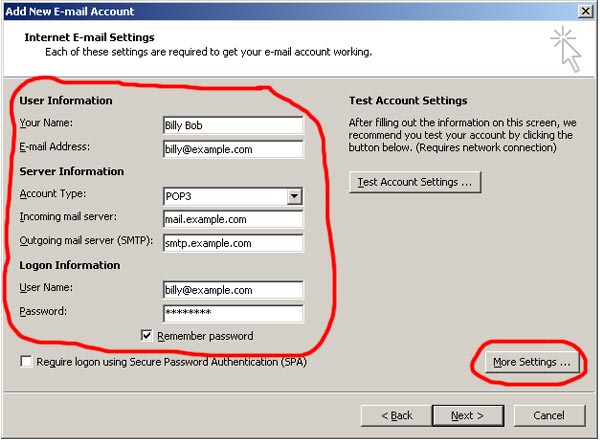
STEP 6 (Internet Email Settings): Now is the fun stuff! (NOTE: The image for this section displays “example.com”… please enter your actual domain name rather than example.com)

Fill out the Email Settings screen as follows:

  • NAME – Enter your name (this is what will show up as “sender” when you email someone.)
  • EMAIL ADDRESS – Enter your email address.
  • ACCOUNT TYPE – POP 3
  • INCOMING MAIL SERVER – mail.yourdomain.com (or .net, .org .biz etc… it depends on what your domain name is)
  • OUTGOING MAIL SERVER (SMTP) – smtp.yourdomain.com (or .net, .org .biz etc… it depends on what your domain name is)
  • USER NAME – Enter your email here.
  • PASSWORD – Enter the password that you use for the above email.
  • REMEMBER PASSWORD – Check the box (unless you have a public computer and do not want others to be able to access your email)

You will now want to click the “MORE SETTINGS” box to the lower right. (see image below)

Step 6 for setting up outlook with homestead email

STEP 6: Internet Email Settings


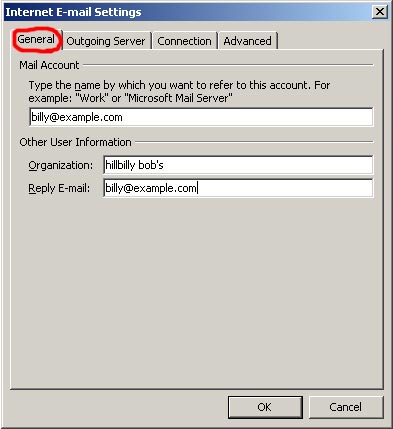
STEP 7 (General): In the “More settings” screen, make sure you have the “General” tab selected. In the top field you will want to enter your email address. DO NOT ENTER YOUR NAME OR OTHER NAME OR ELSE HOMESTEAD EMAIL WILL NOT WORK WITH OUTLOOK. YOU MUST ENTER YOUR EMAIL!

  • Organization – you can enter your name or a company name
  • Reply Email – Enter your email again.

DO NOT CLICK OK! (see image below)

step 7 for setting up homestead email with microsoft outlook 2007

Step 7: Mail Account


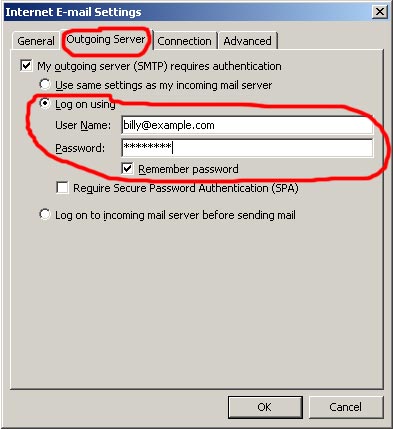
STEP 8 (Outgoing Server): Click on the “Outgoing Server” tab at the top and enter the information as follows: Put a check in the box that says “My outgoing server (SMTP) requires authentication“. You will then select the option that says “Log on using” and enter your information as shown in the image below. (make sure you replace “example.com” with your actual domain name) Select “Remember Password” if you desire. DO NOT CLICK OK! (see image below)

step 8 for setting up homestead email with microsoft outlook 2007

STEP 8: Outgoing Server


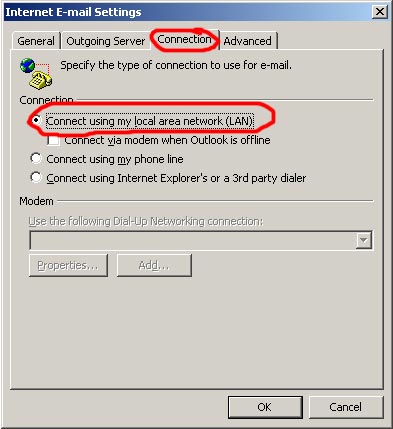
STEP 9 (Connection): Click on the “Connection” tab at the top and enter the information as follows:  NOTE: I have “Connect using my Local Area Network(LAN)” selected because we are on a high speed internet connection and use an LAN line for internet. IF YOU USE A PHONE LINE OR 3RD PARTY DIALER, YOU WILL NEED TO SELECT THOSE OPTIONS ON THIS SCREEN INSTEAD OF THE (LAN) OPTION! DO NOT CLICK OK!(see image below)

step 9 for setting up homestead email with microsoft outlook 2007

STEP 9: Connection


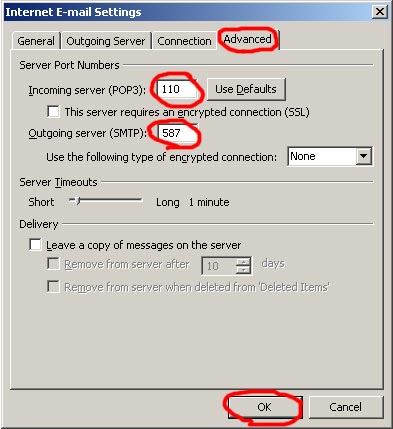
STEP 10 (Advanced): Click on the “Advanced” tab at the top and enter the information as follows:

The only important thing here is to make sure that the INCOMING SERVER (POP 3) PORT is 110 and the OUTGOING SERVER(SMTP) PORT is 587. Your screen should look exactly like the image below. CLICK OK! (see image below)

step 10 for setting up homestead email with microsoft outlook 2007

STEP 10: Advanced


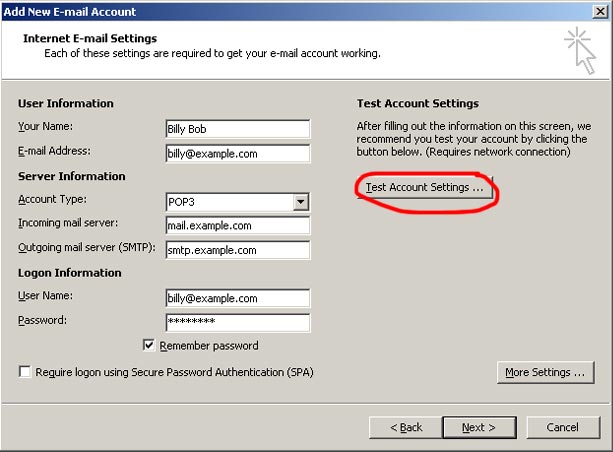
STEP 11 (Test Account Settings): You are finished entering information and should be back on the “Internet Email Settings” screen. You will now want to select “Test Account Settings” to make sure that you entered everything in correctly. (see image below)

step 11 for setting up homestead email with microsoft outlook 2007

STEP 11: Test Account


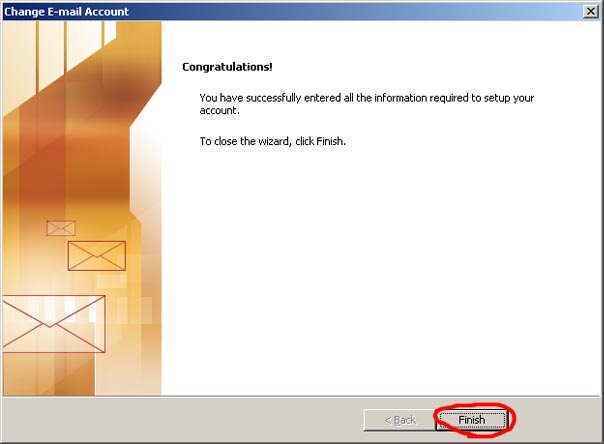
STEP 12 (Congratulations!): If you entered everything in correctly, you should see a screen that says congratulations!, blah blah blah, and you are now ready to start using Outlook 2007 with your Homestead email accounts!!! (see image below)

step 12 for setting up homestead email with microsoft outlook 2007

STEP 12: Congratulations, Your are finished!


If this tutorial did not work out for your particular situation, please send details to homesteadseopro@gmail.com or leave a comment and we will look into a resolution for you.

Please remember to comment and subscribe!

Homestead SEO Pro offers 100% FREE ADVICE for intuit/homestead users. Please return the favor by adding a link to your website pointing to this blog post! We thank you for visiting!


How to Set up Meta Tags in Homestead Sitebuilder.

This article is geared towards the Homestead Sitebuilder user however, the Information included in this article is beneficial to web design and SEO regardless of what software you use.

INTRODUCTION:

When police officers are searching for a suspect, they usually tell people the suspects height, eye color, skin color and what the suspect was wearing. The reason for this is so that when someone locates a person that matches that identity they can report it to the police and the police can find exactly who they are searching for.

Meta Tags for a website work the exact same way. When you set up the meta tags for your website, it is almost like you are giving your website an identity and when the “Google Police” (also called spiders) are searching for a suspect that matches the identity of your website and they find yours, Google will consider your site a possible match for the search and then place you on a line up with 9 other suspects and allow the victim (person searching the internet) to select who the lucky winner is.

Meta Tags are an important piece of source code for your website. They consist of the Meta “Title” Tag, Meta “Description” Tag and Meta “Keywords” Tag. In addition to the content on your website, Meta tags play a very important part in the SEO process of your website. In the following paragraphs I will explain each meta tag in depth to give you a better understanding of how they work and will also show you how to properly set up the meta tags for your website using Homestead Sitebuilder.


META TAG: “TITLE TAG”

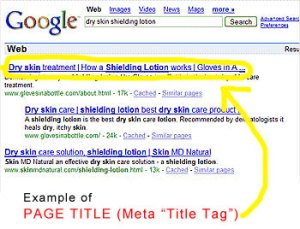
Google judges books by their covers; and in this case, your title tag is your book’s cover (well, website’s cover). The Title Tag (also called “Page Title) is probably the most important meta tag of them all. The Page Title is what you see in bold writing when you are looking at search engineresults pages (SERP’s). –See image below for example.
Setting up your title tag:

You may now be wondering, “How do I set up my Title Tags?” Well, here’s the answer! When you are editing a page in HS Sitebuilder, you will see a link in the top toolbar that says “Page info” When you click on it and see the page info on the right hand side, you will see a section labeled “PAGE TITLE”. (located near the top of the right side). This is where you will enter your “Page Title aka. Meta Title Tag”

When deciding what to enter for your title tags, you really want to make sure you focus on the main keyword/key phrase that you are targeting for that page on your website. For example: If you are a Fence Company in Detroit, Michigan; You may want your web page to focus on the key phrase “Fence Company in Detroit Michigan“.

A good Title Tag for such a company may be “Fence Company in Detroit Michigan – Installation and Supplies“. NOTE: that a page title should be approx. 70 Characters long.

A lot of companies like to place their company name in the title tag. In my professional opinion and experience, you will benefit a million times more if you develop your title tag according to key phrases included in your content rather than place your company name there. If you absolutely MUST place your company name in your title tag, PUT IT AT THE END!


META TAG: “DESCRIPTION TAG”

The meta description tag is what appears below the page title in the SERP’s. (SERP’s also use some of the content that is on the page and not necessarily always the meta description).

When considering what to put in your page description (Meta Description Tag), you want to make sure you place your pages main Keyword(s)/Key Phrase(s) along with a good description of what can be found on that page. The page description should be typed in proper sentences and sound natural. DO NOT just stuff your page description with a bunch of keywords because Google and other search engines have been known to penalize websites that do this.

A good page description for the fence company example above would be: “Fence Company in Michigan offering fence installation, sales and supplies in vinyl, wood, chain link, steel and aluminum“. NOTE: Page description should be approx. 150 characters long.

This description keeps the focus on the main key phrase “Fence Company in Michigan” and also lets the search engines know that they can find more information about fence installation, sales and supplies with a number of different kinds of fence materials. This kind of Page Description would seduce search engines to pick this website as a candidate in the SERP’s because the Title Tag and The Page Description indicate that this page is relevant to a search about fencing in michigan.

How to setup up the Description Tags in HS Sitebuilder:

In the page info section (where you enter the Page Title), you will notice a tab at the top that says “Meta Tags”. You must click on the “Meta Tags” tab in order to get to the PAGE DESCRIPTION section. After clicking on the Tab, you will see the Page Description section and the text box that will allow you to enter your description in it. Make sure you save and publish after you are finished setting up your meta tags.


META TAGS: META KEYWORDS

It is to my understanding that Google does not even consider the Meta Keywords anymore; however, some other search engines may, and Google might in the future so it is still a good idea to set them up.

When setting up your keywords/phrases, you really want to focus on between 2 – 10 keywords/phrases that are highly relevant to the content on your page. For example, if our fence company page was talking all about vinyl fence, we would want some keywords/phrases to be:

  • Vinyl Fence Company Michigan
  • Vinyl fence installation Michigan
  • Vinyl Privacy Fence Michigan
  • Vinyl Gates Michigan
  • vinyl fence supplies Michigan
  • etc, etc, etc.

These would be pretty good key phrases for our vinyl fence company web page because they are all about vinyl fencing in michigan.

How to set up Meta Keywords in Homestead Sitebuilder:

While you are still in the “Page info” section; below the page description section you will see the “Keywords” area. It is in that text box that you will want to enter your keywords. NOTE: Divide keywords with a comma followed by a space. (example: fence, gates, wood fence, chain link supplies, installation)


There are plenty of other things you can do during the SEO process that will help increase your search engine rankings, however, we will explain those another time. I hope this article gives you a better understanding of Meta Tags and allows you to properly set them up with Homestead Sitebuilder.

How to Create a SiteMap.xml in Homestead Sitebuilder and submit it to Google.

When I was in my elementary stages of using “Homestead SiteBuilder” It was a nightmare trying to figure out how to create a site map that Google would accept. I had to dye my hair after that project. Fortunately after many days of research, contacting help support and many other things I was FINALLY able to figure it out. (note: Homestead support was absolutely 0% help with this topic. I usually don’t have complaints about their support, however, when it came to SiteMaps, I received a whole bunch of “I don’t knows” and “pay this much and we can do it for you”. I was quite disappointed).

I have noticed a few websites that offer to show how to create a SiteMap for homestead site builder and properly submit it to Google FOR A PRICE… (bummer). Well, fortunately for you, the HOMESTEAD SEO PRO BLOG cares about the struggles and hard times that HS SiteBuilder users endure. Below I will explain the entire process FOR FREE, all I ask in return is that you continue to visit the Homestead SEO Pro Blog for future helpful articles.

HOW TO CREATE A SITEMAP FOR HOMESTEAD WEBSITE AND UPLOAD IT TO GOOGLE.

STEP 1:

Visit www.xml-sitemaps.com and follow the on screen directions to create your sitemap.xml. Once the generator is finished creating your sitemap.xml, Download it (by following on screen directions), save it to a folder or desktop where you will be able to find i;t because you will need it in a few minutes.

STEP 2:

We now need to get our sitemap uploaded to our Homestead Sitebuilder files. To do this, open up Homestead Sitebuilder and click on the “FILE MANAGER” tab on the left. You will see a button at the top that says “IMPORT”. Click on “Import” and browse for the sitemap that you just saved. Once you find the sitemap in your computer files, select it and click open. Your sitemap will now be added to your Homestead Sitebuilder files.

You will now need to click on the “UPLOAD” tab that is at the top (near the “Import” button). When the mini window opens up asking if you want to upload the entire site, click on upload.

Your sitemap is now uploaded to the internet.

STEP 3:

You now need to log into your google webmasters account. Visit http://www.google.com/webmasters and click on the “Sign in to webmaster tools” icon. If you have not yet added your website to google webmasters, you will need to do so. Click on the “Add Site” button and follow the instructions.

Once you add a site, you will need to verify that you are the owner of this site. Google will provide a verification HTML code that you will need to add to your website. To do so, go to your “Index” page in the Homestead Sitebuilder and on the right you will see 3 tabs (near the top) that say: Basic, Meta Tags and Advanced. Click on the advanced tab. In the advanced tab, you will see a large box (under the <HEAD> tag section) where you will be able to place HTML codes. You MUST place the Verification HTML code that google provides (in the google webmaster tools) inside this text box. NOTE: adding this code DOES NOT show up on your website. Once you add the HTML code that is provided by Google, you need to save and upload the index page.

Once you add the HTML code and save/upload the index page, go back to the google webmasters page and click on the “Verify” button. Google will search your source code for the verification HTML code and then confirm that your site is verified. If done correctly, Your site is now verified.

STEP 4:

Now we need to add your Sitemap to google webmaster. To do so, go inside the google webmasters website and make sure you are logged in. Click on the website that you just verified. Once it opens up the tools for your website, you will see an “Add Sitemap” button near the bottom left side of the page. Click on the “add sitemap” button and it will ask you to type in the sitemap URL. It should automatically have your website entered in followed by a /.

In the text box where you need to type the Sitemap URL, you MUST type in “Sitemap.xml” The finished text should look like http://www.yourwebsite.com/sitemap.xml.

Click the submit button and google will take a moment to verify that your sitemap was created and submitted correctly. (usually takes no longer than 30 minutes).

If done correctly and google accepts your sitemap, You are now finished creating and submitting your sitemap to Google using Homestead Sitebuilder.

Google will take this sitemap into consideration and eventually crawl all the URLs that are entered on this sitemap. As you develop your website and add new pages, you will need to repeat this process and add the new URLs into your site map, Import it to homestead sitebuilder again and upload it, you will then need to RE-SUBMIT it to google.

I hope this tutorial for “Creating a sitemap for Homestead Sitebuilder Websites and uploading it to Google” was helpful. If you have more questions regarding this process, you can send your email to john@netbreakdesigns.com

John R | Design/Marketing | Devline Intermedia/Netbreak Designs | http://www.netbreakdesigns.com | john@netbreakdesigns.com